Creating an R package can be a daunting task, but there are several tools to facilitate this process immensely. Of course, each approach has a series of advantages and drawbacks, so it is very much a subjective thing. Since I have changed my mind and worked on this task frequently, here’s a conclusive* guide of the steps I follow. (* This guide will never be finished, so watch this space, I’ll be coming back to make edits as they seem appropriate).
By the end of this tutorial you will have a highly functional and well documented package, like this, suitable for even more advanced operations like continuous integration and advanced testing.
This blog post is not intended to be a complete guide to packages. For that, please refer to this.
There IS however a youtube tutorial that covers the steps of this guide, you can find it here:
I have also taken the liberty of creating a function that spits out a checklist of steps to follow in my package amitFuncs (which is a bit of a random package of assorted goodness). Anyway, it’s the amitFuncs::packageMakerList() function in there. You can install the package using: remotes::install_github("DataStrategist/amitFuncs").
1. Setting the scene (only do once in your entire life)
So there’s some stuff you have to do before getting started authoring libraries. You will only have to do these steps once (unless you change your laptop or so). These steps are:
a. Download R and Rstudio, but you should alreay know that :) On the off chance that you don’t, hello! Welcome to the R community! Read this to learn how to install and get started with R and Rstudio, and if u want just a quick primer, here u go.
b. You will be version controlling through github, so let’s download git. Install it and set it up w/ your name and email. To do so, open up a console or a git bash, and type:
git config --global user.email "you@example.com"
git config --global user.name "Your Name"
c. Make sure to change the default examples to your email and name. These will be used to show who is doing what, and it’s important even if you don’t plan to work with anybody else.
d. Download Rtools by going here. This contains stuff that helps us build packages.
e. Next, we’ll be engaging supercheat-easymode-yolo-bossMode by using usethis, which is a package whose sole purpose is making your life easy. You will also be using sinew, a package which makes it easier to add documentation. If you don’t have them, install by typing install.packages("usethis"), and/or install.packages("sinew") (you will only have to do this once).
OK! Now you’re ready to rock and roll!
2. Let’s create a new package! First steps:
a. Before you get started, let’s find a good name for your package. In order to help you see if the name you had thought up is already taken, use the package available. The instructions on how to use it are on that page. Once you have a good name, proceed.
b. You are going to start from scratch. You can do this with usethis, or using Rstudio’s wizard.
For usethis:
- Use RStudio’s folder browser to figure out where you want to save your project, and then create a folder. Do so using:
rstudioapi::selectDirectory()(or any other way if not inside Rstudio). You want something that looks like:"C:/Projects/new_package". - Type
usethis::create_package("packageNameAndPath")(the output of the step above). This creates the package - Once inside the new project, type
usethis::use_git()to create the git repo, and create an initial commit.
For rstudio’s wizard:
Click on File >> new project >> new directory >> R package, and make sure to enable git:


CONGRATULATIONS! You have officially created a package! No, of course not… this package doesn’t do any of your stuff… it’s just the default stuff. But still, small victories, right? Anyway, let’s delete all the default stuff and start adding your functions.
3. Housekeeping
a. (If you used the wizard) Delete hello.R from the /R folder.
b. (If you used the wizard) Delete hello.Rd from the /man folder (btw this is where the documentation lives but don’t worry you won’t need to know that).
c. Modify the DESCRIPTION file to say what this package is and how to use it. Add in all the details you want (for author use this format: person("First", "Last", email = "first.last@example.com",role = c("aut", "cre"))). “aut” means “author”, and “cre” means “creator”.
d. Call usethis and sinew: library(usethis); library(sinew).
e. Let’s push this all online! Your package is not ready, but it’s a bit easier to do things in this order. Anyway, git commit all (see git guide in section 1). I use “Initial Commit” as a commit message, but it doesn’t really matter.
e. use_github(protocol = "https") to set yourself up in github (CAREFUL, this will make your work public… you might want to consider private = TRUE if you want it to be kept private. If it protests about no github auth_token, you’ll have
to set one up, but the usethis instructions are kinda clear, follow them.
f. use_readme_rmd() to make it easy to make a front page for your package’s website AND a front-page to the github repository. Saving time for the win! (advanced level note: This function also does some stuff to prevent you from making mods to one file and not the other. Many of the functions in this guide do behind the scenes stuff like that and I won’t get into it… so just trust me, this is a good way to go).
Anyway, read what the readme is saying, fill in some details here and there, and comment out or delete the part about installing from CRAN… we aren’t there yet (commenting out in markdown is different than in R code, but the shortcuts still work).
f. usethis::use_lifecycle_badge(stage = "Experimental") to show that this is a brand new package. Eventually you’ll be moving to “Maturing” and eventually to “Stable”. This function will generate some markdown code and copied it into your README.Rmd in the badges section at the top (it should have been done for you, but just double-check, and if not, copy-paste it in yourself).
g. use_cran_badge() to show how if you’re on CRAN or not (you’re not, but eventually that may change!). Like above, it should have copied for you, but if not, copy the markdown into your README.Rmd.
h. Add a license. Depending on your needs, usethis has a variety of functions to help you with that, but if you don’t know what to pick, usethis::use_mit_license("YOUR NAME") is the easy-peesy one if you don’t really care.
i. use_pkgdown() to have a nice website for your package. Ignore the yml file for now.
j. usethis::use_news_md() to create a NEWS file which you can use to keep track of modifications. For now the first announcement can just be “First release!” or some such.
k. usethis::use_pipe() will create all the necessary stuff for you to use the magrittr %>% pipe.
4. OK, you’re ready to start working on your package!
a. Create a new file in the /R folder (It doesn’t trully matter what you call this file, I just call the file funcs.R and paste all inside, although sometimes it is useful to have one file per function. For now, just start with one file). Write or copypaste your functions into this file ( ProTip: in case you are starting from a tangled mess of functions + function-running-code, maybe sinew::untangle() and sinew::pretty_namespace() can be really useful ).
b. Presumably, you’ve added some functions from other libraries. These are called dependencies, and you need to be explicit about what they are. In order to save time, it’s better to use explicit package::function notation (for example, dplyr::select) at least once per function, as this will be picked up by sinew in the next step, read on.
c. Now build the documentation for each function. To do so:
- select the entire function and click
Run(to commit it into the global environment). - select JUST the function title and run
sinew’screateOxygenadd-in (from the add-ins menu). It will automatically add all the guts required for documentation. Go ahead and fill these out. If you followed step 2b above, exported functions will automatically be added as@importFromblocks.
d. If you have dependencies, make sure that the DESCRIPTION file knows about all the packages that you need. So go to that file and put the package name under a new Imports: section. The function sinew::makeImport("R", format = "description") does this, but it can be a bit wonky, so just keep an eye out. (❕❕Update: Another newcomer to this area is the package attachment, which apparently simplies the process pretty significantly. Give it a try!)
e. Under the build menu, go to more and Configure Build tools to Generate Documentation each time every time you Install and Restart. This way you don’t have to ever think of it again. Eventually if you have tons of documentation you might want to remove that.
f. Since Roxygen2 will be building our NAMESPACE file, go ahead and delete it now… it’ll be automatically recreated as soon as we document.
g. Lastly, consider using usethis::use_code_of_conduct(). I personally don’t because I haven’t observed any abuse in github on my repositories, but I do think that diversity is important, so if you see this cropping up as a problem, please do consider using a code of conduct.
g. Unit tests. They are important, but I think it’s a bit above the scope of this blog post. For now I won’t say anything except hashtag use_testthat() and Extra-credit.
h. You’re done!
5. Rinse and repeat!
OK, that’s more or less the process! From here, it’s just adding functionality and making sure everything works as intended. Everytime you think ok I’m done, remember to do the following:
a. Document your package using devtools::document (if you did step 4.e, then this will be taken care of you).
b. BUILD YOUR PACKAGE!!!!! Very exciting. The best way is to click on Install and Restart from the BUILD tab… but you can also type devtools::build(), although this won’t build the documentation automatically so don’t forget that.
c. Check that everything is fine, type devtools::check(). (more than likely check will have brought up tons of problems… don’t stress! check below to see what to do when all fails).
Every time you make a modification you’ll have to repeat these steps.
6. Quality Control:
a. You might see a ton of errors like below:
no visible binding for global variable blah
which might be one of two things:
- You have maybe forgotten to
@importFromsome functions. Make sure all of these are perfectly done or your package will probably be buggy. - You have used tidyverse (to be precise, the NSE portion of it), and it doesn’t know that “Species” is
iris$Species. In order to eliminate this error, evertime you’ve usedSpeciesalone, you are going to have to replace it with.data$SpeciesAND make sure that you add@importFrom rlang .datato the documentation of each function where this is an issue.
b. You will have more than likely forgotten to include some references to packages in the DESCRIPTION file, that’s typical… just fix it up.
c. When trying to CHECK your package, R will build some artifacts that sometimes don’t get deleted. These are a .Rcheck folder and a .tar file. Make sure to delete these everytime you try to check your package. If you suspect that something wonky is happening, use this: amitFuncs::pleaseForTheLoveOfGodLetMeBuild()
d. (❕❕ Update:) The package flow allows the creation of some pretty cool flowcharts that visualize the functions in your package. Install the package (remotes::install_github("moodymudskipper/flow")), and then try out flow_view(YOUR_FUNCTION_HERE) to visualize your function. Or use flow_run to visualize the path that the inputs take through your package. See the documentation on the above.
7. Final Steps:
a. OK, we’re almost done!!!! SO EXCITING! Now, remember to check all your documentation. We have 4 places to check:
- In the documentation for each function’s Roxygen,
- in
README.Rmd, - and in the DESCRIPTION.
- (for major changes, the
NEWSfile too)
Make sure you update these whenever you make changes to the code.
b. Run goodpractice::gp(), which will check for things that aren’t technically wrong, but are probably not goodpractice. The package’s maintainer is also a lovely person.
c. pkgdown::build_site() will build the website for your package. Remember to redo this everytime you want to do add text to the site!
d. ok, let’s get this all up there! Git commit and push!
e. Help users find your website. Go into the Repository’s Settings page (careful to not enter github settings, but the settings for that repository), and under Github Pages, mark the Master Branch - docs folder as the source. This will pop up a URL (you’re going to have to scroll back down to get it… annoying). Anyway, it’s the one that says something about github.io. Copy it.
f. Now go back back to the Repo’s main page and click on the About thingie on the top right hand side of your your Repo’s title, and paste that URL into the Website textbox.
8. Coming back to your package later
Some time in the future, you will want to add some functionality or change some things in your package. When your modifications are done, keep incrementing the version in the DESCRIPTION file. The first time, type usethis::use_dev_version() to advance the development version of the package (this will help identify if there are problems with one of your versions). You can skip sections 1-3 and go ahead with Sections 4 and on.
If you think you’ve made a major improvement in the package, go ahead and change the Major version by using usethis::use_version(). Make sure to write down what has changed in the NEWS file.
As your package becomes more tested, this is refered to as the maturity of the package. Eventually you’ll be moving from “Experimental” to “Maturing” and eventually to “Stable”. When that happens, you’re ready to submit to CRAN!
9. Extra stuff to consider
a. The best way to explain how the various functions of your package are to be used with one-another, is to use a vignette. It’s more or less like an extended example, or case-study. Use use_this::use_vignette to build the backup files for you.
b. Testing, Travis-CI & Codecov… but that’s for another time… for the moment if you’re curious… check this out.
10. Extra-credit
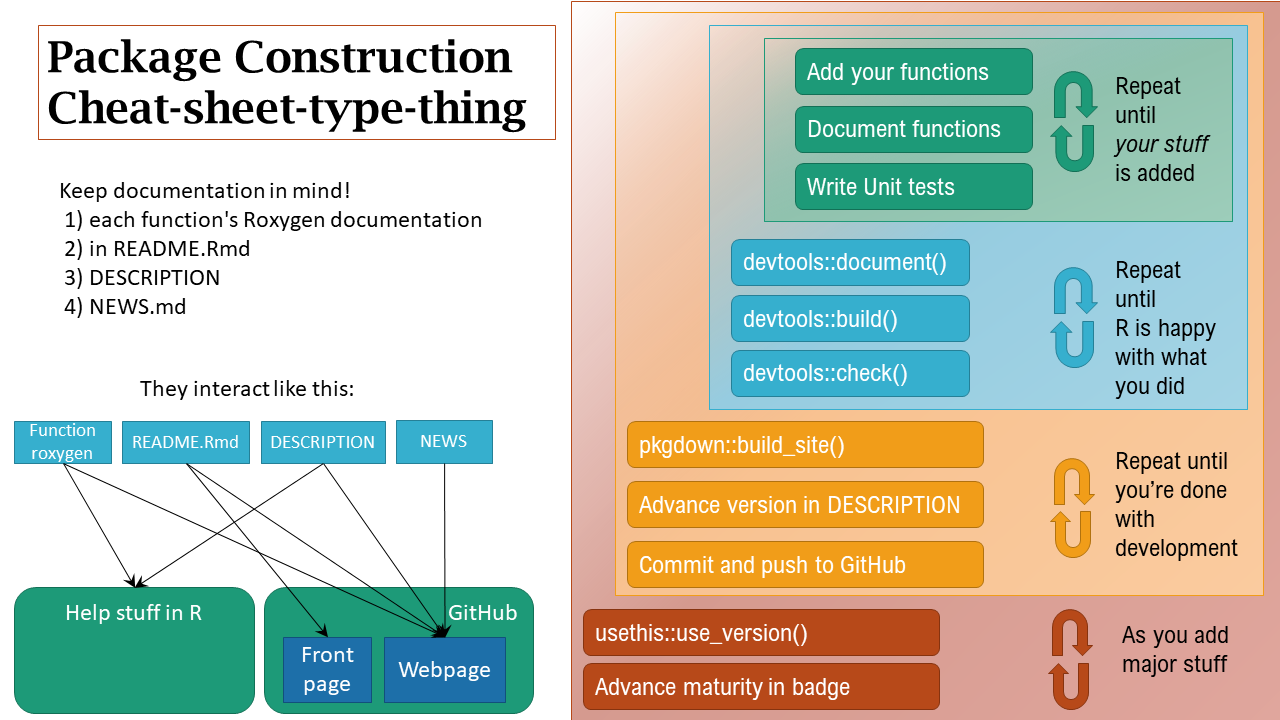
Since you’re awesome and have made it to the end of the blog post, here’s an extra surprise for you! The cheatsheet with the overall kind of mental flow that I go through when I develop packages. Hope it’s useful!
11. (Update!) Starting from a folder already set up
What if you have already done a ton of work and just want to convert your work to a package? Well, Tan Ho presented in a presentation that we can easily capture everything using the usethis package:
## this code is verbatim from the presentation referenced above, go check it out!

library(usethis)

use_description() # use template
use_mit_license() # add license of choice
use_package() # add dependencies
use_latest_dependencies() # specify version of dependencies you used